1.QUICK START
The Apache 700XR Mini is designed to control automatic acces. While it uses a phone number as access code, through Caller ID.
The Apache 700XR Mini works with contract as well as prepaid Sim cards. When using a prepaid card, notice that some providers let the call credit expire after a certain time. Some prepaid cards have to be upgraded once a year. Be sure the card is activated by your provider before you insert the card in the XR. Also, disable the PINcode and the voicemail, than the XR is immediately ready for use. To control the unit via IP your SIM also has to have a data plan.
Please note that the operation of the unit is dependent on the correct functioning of the GSM network according to the indicated specifications.
Wait about two minutes after connecting the power. The XR is going to subscribe itself at the provider. You can program the XR through the following commands.
Suitable for standard
SIM card or ask your
provider for an adapter.
Only works with 2G
network.
<image>
2.COMMANDS
1.1 Password
Every SMS starts with p:password (standard 1234) Example: P.1234A.0541122333.0544455666 The command P. the password is 1234 The command A. is add new phone number to the list, in this example: 0541122333 and 0544455666
1.2 Add new phone number
A.phone number,phone number,… Add new phone numbers to the phone list Example: P.1234A.0547512152.0525874525 Add 0547512152 and 0525874525 to the phone list. When more phone numbers have to be added, than put a DOT between the phone numbers, all SMS size can be used.
1.3 Add special new phone number
AS.phone number.1.from time,to time week days Add one new special phone number to the special list with specific hours during the week days. The “from time” and the “to time” syntax is HHMM (with no spaces) Example 1: P.1234AS.058126248.1.1130.1540.135
Phone number 058126248 will be allowed to enter from 11:30 to 15:40 on Sunday, Tuesday and Thursday ( 1234567 weekdays starting with sunday) Example 2: P.1234AS.058126248.1.2300.0200.24
Phone number 058126248 will be allowed to enter from 23:30 to 02:00 on Monday and Wednesday.
AS.phone number.3.Entries amount
Add one new special phone number to the special list with limited entries amount. Example 1: P.1234AS.058126248.3.6
Phone number 058126248 will be allowed to enter 6 times Example 2: P.1234AS.058126248.3.11 Phone number 058126248 will be allowed to enter 11 times
1.4 Delete phone number
D.phone number.phone number Delete phone numbers from regular phone list. Example: P.1234D.0542684284.0542358721 Phone number 0542684284 and 0542358721 deleted from the regular phone list, put comma between the phone numbers, can use all SMS size. When more phone numbers have to be added, than put a DOT between the phone numbers, all SMS size can be used.
1.5 Delete special phone number
DS.phone number.phone number Delete phone numbers from special phone list. Example: P.1234DS.0542684284.0542358721 Phone number 0542684284 and 0542358721 deleted from the special phone list. When more phone numbers have to be added, than put a DOT between the phone numbers, all SMS size can be used.
1.6 Set pulse time (advanced)
GOD.gate open delay Set the time of the pulse when calling to the unit, Maximum 60 seconds. Example: P.1234GOD.7 Set the gate open to 7 second delay.
1.7 Clock update
CU Clock update, update the unit’s clock from the SMS send time. Example: P.1234CU
1.8 New password
NP.new password Sets new password to the XR unit (the CSD password infect also). (be careful with it, when lost, the module has to get back to the manufacturer) Example: P.1234NP.4321 Change the password to 4321
1.9 Enable\Disable
EN.1.0 Set the XR unit to enable or disable. Example 1: P.1234EN.1 Enable the XR unit Example 2: P.1234EN.0 Disable the XR unit.
1.10 Get unit information
INFO
Get information about the XR unit:
- Amount of numbers in the phone list
- Amount of numbers in the special phone list
- Reception level
- XR Unit Enable\Disable
Example: P.1234INFO
1.11 Reset unit
RESET
- Reset the XR unit
- Example: P.1234RESET
1.12 Enable\Disable phone list
OPEN.1.0
Enable\Disable phone list Example 1: P.1234OPEN.0 Enable phone list (Only phone numbers that are in de phone list can disable the XR unit) Example 2: P.1234OPEN.1 Disable phone list (All phone numbers can disable the XR unit).
1.13 Requesting unit IP-address
IP? Requesting the IP-address of the unit
Example: P.1234IP?
1.14 Set APN (from XR version 2.1.8)
GPRS.<EN>,<FIREWALLIP>,<APN>,<USERNAME>,<PASS>
The parameters are: EN is 1 or 0. For activating APN, set 1. For disabling APN set 0. FIREWALLIP is the Firewall IP. APN is the APN number. USERNAME is the username (not always necessary). PASS is the password (not always necessary). You can obtain all required data from your provider. Example: P.1234GPRS.1,62.133.1.0,advancedinternet,user,user This sets the APN. NOTE: if you don’t supply a certain field, you will still have to send the comma. Example: P.1234GPRS.1,,advancedinternet,,
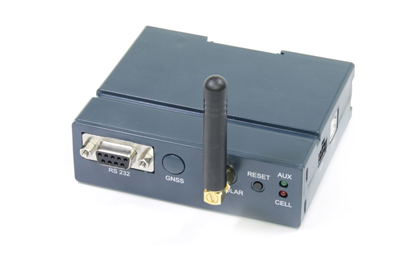
3.CONNECTIONS / TECHNICAL DATA
Technical data:
- Frequency bands: Quad band: GSM 850/900/1800/1900MHz
- Power supply: 5-24Vdc
- Operating temperature: -20°C tot +70°C
- Dimensions (max): 85mm x 48m x 21m
- Weight: 60g
- RoHS, WEEE: All hardware components are fully compliant with
the EU RoHS and WEEE Directives
Red: Input / Output power 5-24 Vdc
Black: Ground
Yellow: COMMON
Green: Normally open Relay
Blue: Normally closed Relay
<image>
Supply voltage requirements
The DC power supply must be connected to the POWER input:
- Input voltage range 5 – 24V DC
- Nominal voltage 12V DC
- Power Supply current rating: min. 1,2A @12V
- Power Supply ripple: max. 120mV
- Input current in idle mode: 20mA @ 12V
- Input average current in communication mode: 100mA @ 12V
he power supply of the XR Terminal has to be a single voltage source of POWER 5V-24Vdc capable of providing a peak during an active transmission. The XR Terminal is protected from supply voltage reversal. An internal fuse ensures an electrical safety according to EN60950. This fuse is not removable. A fast acting fuse 0.8A with melting is necessary to use with the XR Terminal at a 24V power supply system for vehicles. The power supply must be compliant with the EN60950 guidelines.
4.LED STATUS
Green LED displays the status of the GSM network.
- Permanently on: Unit Ready for calls
- Slow interrupt sequence: No sim card / no network
- Permanently off: Device off / relay is switching
Red LED displays the status of the unit.
- Permanently on: Unit is receiving a call
- Fast interrupt sequence: Searching for network / Not registered / Device is being turned of
- Slow interrupt sequence: Registered to GSM network
- Permanently off: Device off
Yellow LED displays the status of the internal software.
- Permanently on: Software ready / loading contacts
5. PROGRAMMING THROUGH XR MODEM
When you want to program more phone numbers at once, or if you want a clear overview of al the phone numbers registrated, consider an XR Modem unit. You can connect to the XR Mini with the modem unit, everywhere in the world. The following text describes the functioning of the modem.
For activating the modem, the RS232 connection cable has to be
connected from the modem to the PC. Also, the small antenna has to be mounted on the modem.After starting up your PC, you’ll have to choose the correct COM-port for providing a correct communication with the modem.
When you’ve choosen the correct COM-port, you should check the ‘Use modem’ box that appears in the pop-up box. The entry window “Unit number” is now released and you can add the number of the SIM card of the XR unit to make the contact complete. Remember that you enter the correct password (number) that belongs to the XR remote conrtol unit!
<image>
Now press “OK” and the settings are entered correctly. Then press “Connect to Unit ‘. The modem will connect to the XR remote Unit. Once the connection is established, you can use the XR unit exactly the same as when you would had have contact using the cable.
Software description
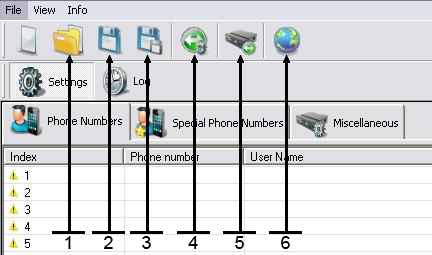
- Open backup unit data from the PC file
- Save
- Save as …
- Select connection Modem via CSD
- Make connection to the unit
- Select language
Add phone numbers
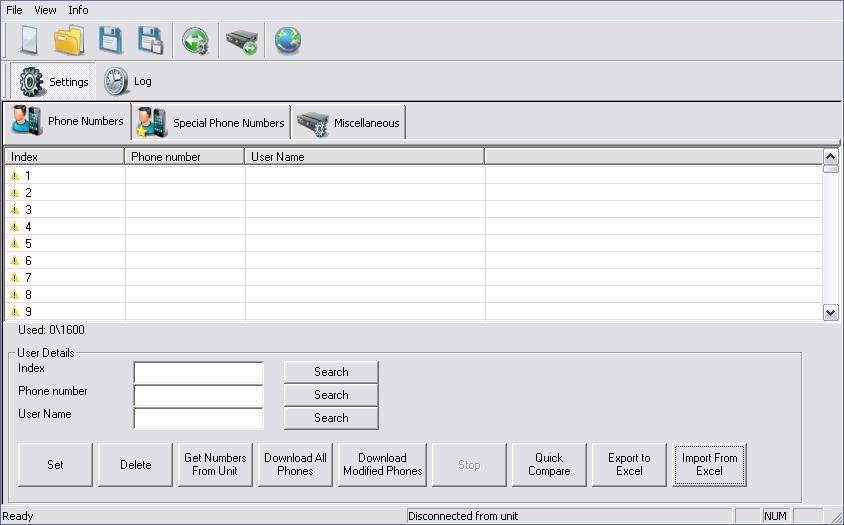
- At this page enter all regular phone numbers that will activate the XR unit.
- Those phone numbers don’t have time or date limitation.
- The list can hold 1600 phone numbers.
- To load new phone number use the 3 blank boxes USER DETAILS.
- After enter a phone number klick on SET. The new user is now on the list.
- To load long list of phone numbers and user names use INPORT FROM EXCEL, this way you can easily add phone numbers.
- Box icon, to make first time excel file use EXPORT TO EXCEL, this way the basic file with all column will be show. After clicking this button you’ll be asked where to save the file. Select de desired location and thereafter open the file. It will look like this:
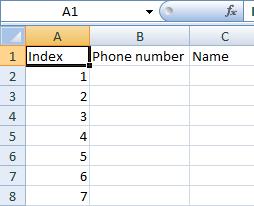
In the empty boxes you can fill in the phone numbers, coupled to the name. Note: Only fill in numbers at the phone number box!
- To compare the phone number list that in the XR unit to the list on the PC file, use QUICK COMPARE box icon.
- When new phone number enter to the software list on the index will appear the phone number with yellow marker, after loading the number to the XR unit the index marker will change to green.
- The GET PHONE NUMBERS FROM UNIT box icon, allow to get phone
numbers store on the XR unit. When all numbers are green the process can be paused by clicking the STOP button. - When looking for phone number or user name on the list, use the search boxes icon.
- Pay attention on the lower right side of this page there is massage box that give the software to XR unit connection status DISCONNECTED FROM UNIT or CONNECTED TO UNIT.
Add special phone numbers
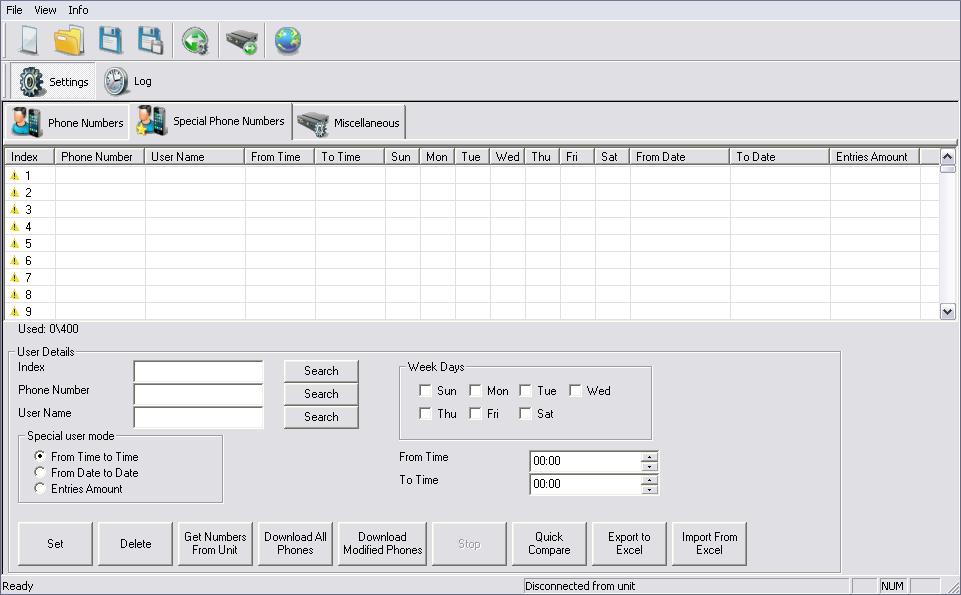
- At this page enter all special phone numbers that will activate the XR unit.
- Those phone numbers will have time or date limitation.
- The list can hold 400 phone numbers.
- To load new phone number use the 3 blank boxes on the lower left side of the page, then select what kind of limitation this phone number will have, there is 3 options FROM TIME TO TIME, FROM DATE TO DATE, ENTERY AMOUNT. For the FROM TIME TO TIME fill the week day and the time boxes. For the FROM DATE TO DATE file the date to date boxes. For the ENTERIES AMOUNT file
the number of entries box. - To load long list of phone numbers and user names use INPORT FROM EXCEL box icon, to first time excel file use EXPORT TO EXCEL, this way the basic file with all column will be show.
- When new phone number enter to the software list on the index will appear the phone number with yellow marker, after loading the number to the XR unit the index marker will change to green.
- To load new phone number to the XR unit us the SET box icon. The new user is now on the list.
Miscellaneous
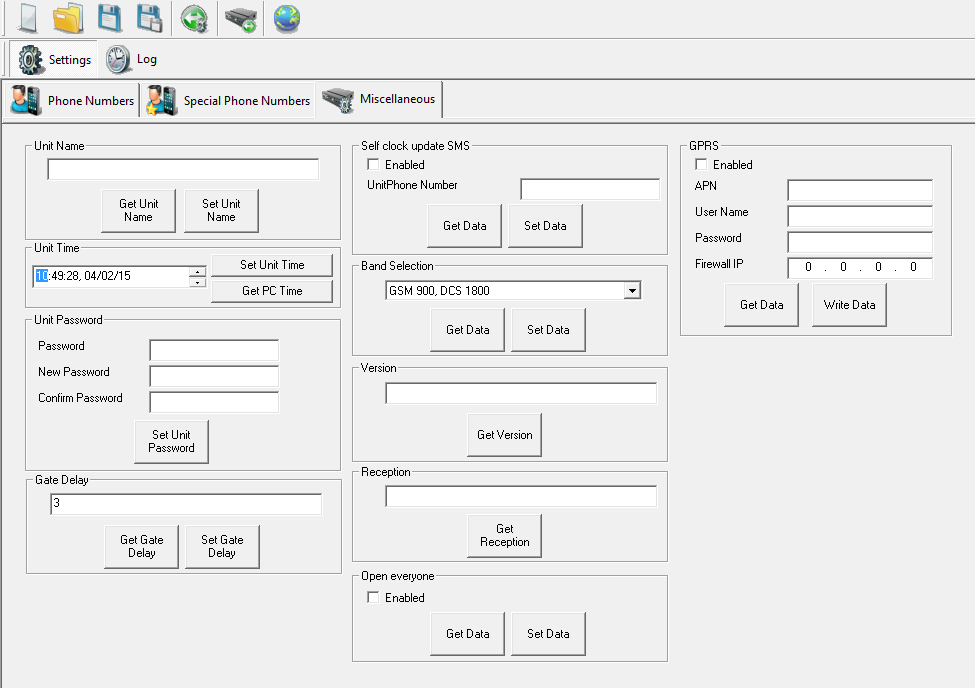
- At this page set all miscellaneous options that will activate the XR unit.
- UNIT NAME, for multi gate user, each unit have name.
- UNIT TIME, set time for special phone number and log.
- UNIT PASSWORD, change unit password, same password apply to SMS
RS232 or CSD connection. - SELF CLOCK UPDATE SMS, on unit power up, unit can get the time from self SMS, fill the SIM number on the unit to this box.
- BAND SELECTION, 4 options for band selection for EUROPE and North America.
- VERSION, get unit software version.
- RECEPTION, get unit reception level under 30% will consider low level, try toimprove GSM antenna location for better reception.
- GATE DELAY, unit set to 3 second normally, for different time delay set this box.
IP configuration (as from XR version 2.1.6)
- GPRS: Here you can enter the data for IP connection with the unit. Check with your provider for the following information and enter it here: APN and – possible – user name and password. Let “Firewall IP” in most cases be default 0.0.0.0.
- Press ”write data”
- Restart the unit by disconnecting the power or by pressing the reset button.
- Send – once the unit is restarted – an SMS to the unit with P.1234IP?
- You can now connect through IP by entering the just received IP address into the “communication selection” window.
Log
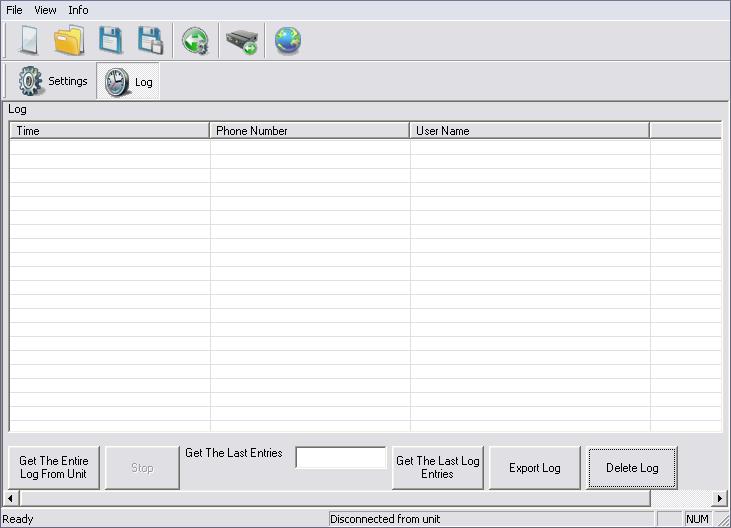
- At this page each call will be register for log report.
- Log can be exported to excel file.
- Unit can save 1000 log lines.
The modem works with soware upward of version 0.0.14
6.SAFETY REGULATIONS
The product, XR/Mini EZgate Terminal,
Fulfills the essential requirements of the 89/336/EEC directives.
The following standards were applied:
EMC Test Certificate
- EN 301 489-1 V1.8.1: 2008
- EN 301 489-1 V1.3.1: 2005
- FCC Part 15, Sub-part B, Class B
RADIO Test Certificate
- EN 301 511 V9.0.2:2003
- Clause 5.2.16 Radiated Spurios Emissions
- MS Allocated A Channel
Type Test Certificate
- EN 60950-1:2006/A1:2010
The complete declaration of conformity is available.